The Memotech MTX series of computers were superior 8-bit computers of the 1980s. Although initially supplied with a ROM BASIC later addons included disk drives of various formats, which could be accessed from extensions to the ROM BASIC or the system could boot CP/M 2.2. The definitive source of information about Memotech computers is Dave Stevenson's site.
MEMU is a full featured emulator of the MTX systems originally written by Andy Key. Andy's version of MEMU is available for Microsoft Windows or Linux from here. Discussion of MEMU can be found here.
This code is a fork of Andy's original to include some additional features and support different patforms. This release currently supports:
The full (Linux) version of MEMU provides just about complete emulation of the original hardware, including:
It provides emulation of some modern hardware add-ons:
There are also features to assist Z80 software development and debugging:
Discussion of MEMU can be found here.
Hardware Requirements:
It is recommended that the code be compiled on a Raspberry Pi. This is the only build that has been tested.
        wget https://raw.githubusercontent.com/raspberrypi/pico-setup/master/pico_setup.sh
        chmod +x pico_setup.sh
        ./pico_setup.sh
Reboot to complete setup. Log back in, then:
        cd pico
        git clone https://github.com/Memotech-Bill/MEMU.git
        cd MEMU
        mkdir build-pico
        cd build-pico
        cmake -DTARGET=Pico ..
        make
The MEMU folder should be at the same level as the pico-sdk and pico-extras folders:
The resulting memu-pico.uf2 file can then be copied onto the Pico, or the memu-pico.elf file loaded using the debug connector on the Pico. See "Getting Started with Raspberry Pi Pico".
The hardware is configured as follows:
The following pre-requisites are required when building on a Raspberry Pi:
To build the X-Window version of MEMU (for use with GUI):
        git clone https://github.com/Memotech-Bill/MEMU.git
        cd MEMU
        mkdir build-x
        cd build-x
        cmake -DTARGET=XWin ..
        make
To build the Framebuffer version of MEMU (for use without a GUI):
        git clone https://github.com/Memotech-Bill/MEMU.git
        cd MEMU
        mkdir build-fb
        cd build-fb
        cmake -DTARGET=FBuf ..
        make
The framebuffer version requires permission to open /dev/fb0. This may require
membership of a particular group such as video (see ls -l /dev/fbo).
To add a user to the video group use the command:
sudo usermod -a -G video username
Replace username by the required user. If necessary, replacs video
by the required group.
To build the experimental SDL3 version of MEMU (for Wayland support):
        git clone https://github.com/libsdl-org/SDL.git
        cd SDL
        git checkout release-3.2.0
        cd ..
        git clone https://github.com/Memotech-Bill/MEMU.git
        cd MEMU
        mkdir build-sdl
        cd build-sdl
        cmake -DTARGET=SDL ..
        make
Alternately, to build against a copy of SDL3 installed by a package manager:
        git clone https://github.com/Memotech-Bill/MEMU.git
        cd MEMU
        mkdir build-sdl
        cd build-sdl
        cmake -DSDL_SHARED=Y -DTARGET=SDL ..
        make
Note: The framebuffer version is intended for use from the console keyboard and screen. It will not work over an SSH connection.
The executables "memu-x" or "memu-fb" should be in the ../run_time folder. For older versions of CMake, they may either be in the root of the build folder, or in the "src/memu" sub-folder. Copy the executable into the root of the "run_time" folder.
The Linux version of MEMU will run on many single-board computers such as the Raspberry Pi. On such systems, the use of GPIO to connect to real hardware is potentially useful, so this has been re-implemented as an optional feature of the Linux builds, using standard Linux software interfaces. To enable this feature, add the following switches to the cmake line of the Linux build instructions:
To use GPIO attached hardware, it is necessary to use the switch -hw-config when starting MEMU to give the name of a file specifying the hardware attached.
The Linux builds of MEMU (documented above) will compile and run on any version of Raspberry Pi. The original Raspberry Pi build (documented below) had two additional features:
The software interfaces used to implement these features have been obsoleted by recent versions of Raspberry Pi OS, and are not available at all for the Raspberry Pi 5.
The GPIO interface as been re-implemented using standard Linux system calls (see above) which should work on all models of Raspberry Pi with a recent operating system.
This build is intended to be run from an operating system, typically "Raspberry Pi OS". It does not require a GUI, instead it uses the VideoCore IV GPU to display full screen.
This build must be done on a Raspberry Pi, as the VideoCore libraries are required. To build this version of MEMU:
        git clone https://github.com/Memotech-Bill/MEMU.git
        cd MEMU
        mkdir build-rpi
        cd build-rpi
        cmake -DTARGET=RPi ..
        make
The "memu-pi" executable should be in the ../run_time folder. For older versions of CMake, it may either be in the root of the build-rpi folder, or in the "src/memu" sub-folder. Copy the executable into the root of the "run_time" folder.
Notes:
This build uses the VideoCore GPU to compose the display. It therefore requires use of the old FKMS driver, not the new KMS driver. Therefore edit the file "/config.txt"
The display must be connected to one of the outputs controlled by the VideoCore (e.g. HDMI), and the keyboard attached to a USB port. This version will not work over an SSH connection. Use memu-x for that.
The bare-metal version of MEMU relies upon the Circle bare-metal programming environment for the Raspberry Pi. It has been tested with release 43.3 of Circle.
It is necessary to build a version of MEMU specific to the type of Raspberry Pi it is to run on as outlined in the following table:
| RPI | Executable | Models | Optimized for |
|---|---|---|---|
| 1 | kernel.img | A, B, A+, B+, Zero, (CM) | ARM1176JZF-S |
| 2 | kernel7.img | 2, 3, (CM3) | Cortex-A7 |
| 3 | kernel8-32.img | 3, (CM3) | Cortex-A53 |
| 4 | kernel7l.img | 4B, 400, CM4 | Cortex-A72 |
To build a Circle version of MEMU, run the following commands, where the ? is replaced by a number (1 to 4) from the first column of the above table, according to the Raspberry Pi version required:
        git clone https://github.com/Memotech-Bill/MEMU.git
        git clone --depth 1 --branch Step43.3 https://github.com/rsta2/circle.git
        cd MEMU
        mkdir build-circle
        cd build-circle
        cmake -DTARGET=Circle -DRPI=? ..
        make
If required it is possible to create multiple build folders (e.g. "build-circle1" to "build-circle4") and build programs for each version of Raspberry Pi.
Installation requires an SD or SDHC card formatted with a FAT partition as the first or only partition. Copy into this partition:
Requirements:
Download and configure the portaudio code:
        git clone https://github.com/PortAudio/portaudio.git
        cd portaudio
        git checkout tags/v19.7.0
        cd ..
Download and build the MEMU source code:
        git clone https://github.com/Memotech-Bill/MEMU.git
        cd MEMU
        mkdir build-win
        cd build-win
        cmake -DTARGET=Win ..
        cmake --build . --config Release
Alternately, to build the experimental SDL3 version of MEMU:
        git clone https://github.com/libsdl-org/SDL.git
        cd SDL
        git checkout release-3.2.0
        cd ..
        git clone https://github.com/Memotech-Bill/MEMU.git
        cd MEMU
        mkdir build-sdl
        cd build-sdl
        cmake -DTARGET=SDL ..
        cmake --build . --config Release
If MEMU is started without any command line arguments, it will usually start in whichever emulation mode it was last used in. When first installed that will be emulating a Memotech MTX512 running ROM BASIC.
For instructions on using MEMU as a Memotech, please read the Memotech manuals, copies of which can be found here.
For versions of MEMU (FBuf, RPi, Circle) which use the full screen to display each MTX screen (VDP, CP/M ...) use keys <Ctrl+F1>, <Ctrl+F2> etc. to switch between each screen.
To configure MEMU for different emulation modes, open the configuration screen or window. Because different operating environments capture different keys, a number of different key presses may be used to open this screen:
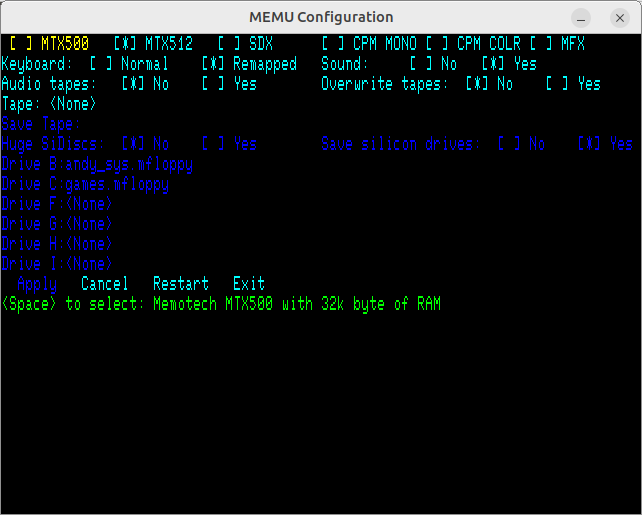
Use the arrow keys to navigate the options and either <space> or <Enter> to select an option. The <Esc> key can be used to exit sub-menus.
The top row of the screen is used to select the basic emulation mode:
The body of the screen is used to provide details:
The lowest line on the screen provides some brief help. The line above is used to exit the configuration:
In order to be used by MEMU, disk images should be placed in the "disks" sub-folder below the folder containing MEMU and the configuration files. Similarly, tapes should be placed in the "tapes" sub-folder. This repository only contains a few example tape and disk image files. Many more can be obtained from:
The image below shows a typical configuration for SDX emulation, with a tape file ready for loading with the command LOAD "", and a disk of games available for USER LOAD "game". Any user programs can be saved with USER SAVE "name"

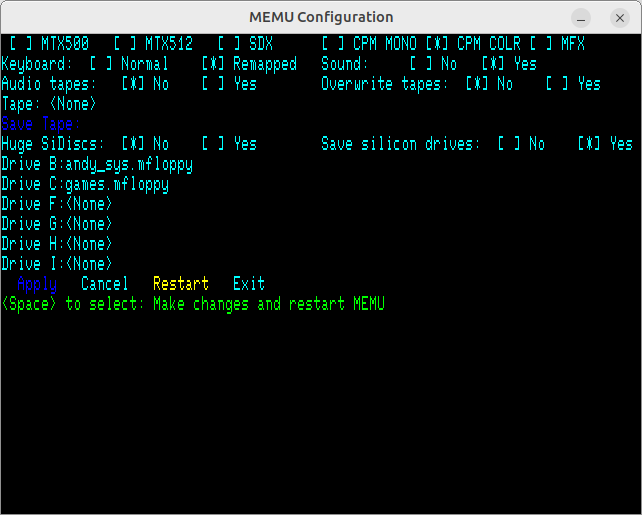
A typical configuration for CP/M emulation, with two floppy disks, is shown below.
MEMU is not able to directly access files stored by the operating system. Instead the program reads files that are are binary copies of the contents of CP/M disks. To access the CP/M files on a modern PC you need to use a program which understands the CP/M disk format.
The traditional set of programs for that is cpmtools. For most Linux distributions they can be installed using the distribution's package manager. Versions for Microsoft Windows can be downloaded from here. Cpmtools requires a disk definition file which defines the exact layout of the disk image. Andy Key's website provides a disk definition file for all the Memotech disk formats.
The two most commonly used formats with the MEMU emulator are:
Cpmtools are traditional command line utilities. To make the CP/M images more accessible on modern machines, Andy has also developed software whicch enables the CP/M image to be mounted and accessed using standard GUI file managers. These are:
An empty disk image can be preduced by creating an empty file, mounting it as a disk in MEMU, then using one of the Memotech utilities to format the drive. Once formatted, close MEMU and use one of the above tools to copy files into the image.
For the real CFX-II or MFX interfaces, the CF or SD media can store up to eight images of 8MB CP/M disks. With MEMU, eight separate image files may be specified, one for each of the 8MB CP/M disks. Alternately, a single large file containing a complete image of the storage media may be given as the first file name. The media image may optionally include data for HexTrain beyond the CP/M disk images, and / or include an MBR partition table. With Linux it is even possible to specify a media device containing physical media from a Memotech
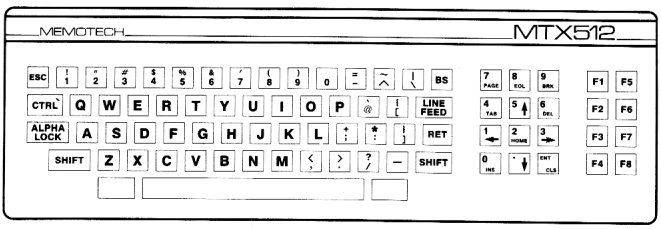
The layout of the MTX keyboard (illustrated above) differs somewhat from that of typical modern keyboards.
The two unlabelled keys either side of the space bar are reset keys. Pressing both simultaneously resets the MTX. In MEMU this is emulated by simultaneously pressing the <Alt> and <Alt Gr> keys to reset the emulated MTX.
One difference that causes a few problems is that there are a few symbols which have different shift states compared to modern keyboards. MEMU translates each key press into pressing the corresponding key on the emulated MTX keyboard. However, for these symbols the wrong shift state will be selected.
The original solution to this was to require typing a different key to produce the required symbol, as follows:
| To produce symbol | Type the following key |
|---|---|
| ^ | = |
| : | # |
| @ | ' (quote) |
| = | ^ (shift 6) |
| ' (quote) | @ (shift quote) |
| # | £ (shift 3) |
| ` (back quote) | (shift back quote) |
To improve on this, the emulation is modified slightly compared to the original hardware. The MTX keyboard is wired as an 8x10 matrix. However the keyboard only has 77 keys (plus the two reset keys). Thus there are three gaps in the matrix. The emulation fills these three spaces with three new keys which have most of the above symbols at shift states corresponding to modern keyboards. These new pseudo keys are:
| Drive Line | Sense Line | Unshifted symbol | Shifted Symbol |
|---|---|---|---|
| 4 | 8 | = | ^ |
| 5 | 8 | ' | @ |
| 6 | 8 | # | : |
If keyboard remapping is enabled, and <Shift Lock> is set on the keyboard then pressing one of these symbols on the keyboard activates one of these new keys in the emulation rather than the original keys. The BASIC and CP/M ROMs are patched to recognise these new keys. However any programs with their own keyboard drivers will not know about these new keys and so will not work properly. Turning off <Scroll Lock> reverts to using the original MTX key mapping.
It is still necessary to press <Shift> to produce a back-quote symbol, but this is rarely needed.
The cursor keys on the keyboard are mapped onto the MTX cursor keys as expected, and the other navigation keys are:
| Keyboard | MTX Key |
|---|---|
| Insert | Ins |
| Delete | Del |
| Home | Home |
| End | EOL |
| Page Up | Page |
| Page Down | Cls |
For game playing, the physical layout of the keys is often important. For this reason, by default MEMU maps the top left portion of the keypad onto the MTX keypad as shown.
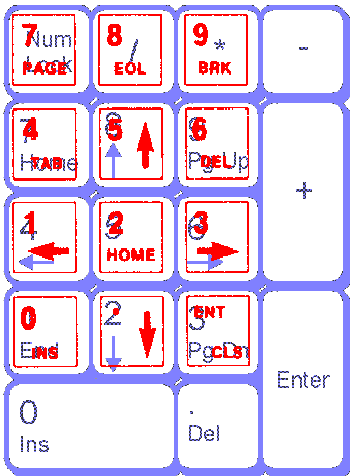
| PC Keypad | MTX Keypad | ||
|---|---|---|---|
| Normal | Shifted | Normal | Shifted |
| Num Lock | Page | 7 | |
| / | EOL | 8 | |
| * | Break | 9 | |
| Home | 7 | Tab | 4 |
| Up | 8 | Up | 5 |
| Page Up | 9 | Del | 6 |
| Left | 4 | Left | 1 |
| 5 | Home | 2 | |
| Right | 6 | Right | 3 |
| End | 1 | Ins | 0 |
| Down | 2 | Down | . (Decimal) |
| Page Down | 3 | Cls | Ent |
However this again results in some of the keys not having the effect indicated by the keycap. The <F12> key toggles the "Num Lock" LED. If this is illuminated then the the key mapping is changed to correspond to the labels on the keycaps. In particular the keys produce the expected numbers when the shift key is pressed. The <Num Lock> key can not be used for the toggle as it is part of the keypad mapping.
On versions of MEMU where each display is shown full screen, ideally use the combination of the <Alt> key and a function key to select the different displays. Unfortunately in some environments the operating system grabs those key combinations. In that case use the left <Ctrl> key in combination with a function key. To send a <Ctrl> and function key to a program running on MEMU, use the right <Ctrl> key.
On machines with compact keyboards having no separate numeric keypad, the key layout can make game playing difficult. To work around this an option is now provided to assign keys on the main keyboard to those MTX keys necessary for the game controls.
This alternate keyboard mapping may be quickly turned on and off. Typically it will be turned off so that all the alphabetical and numeric keys are available while typing whatever commands are needed to load the game. Once the game is loaded the alternate mapping is activated, assigning some of the main keyboard keys to the game controls.
The alternate keyboard mapping is completely configurable, both for the key or keys needed to activate and deactivate it, and the mapping of the host keyboard keys to MTX keys. The configuration is defined by a text file with the following format:
This line defines the key combination needed to toggle on or off the alternate keyboard mapping. It consists of one or more key names, separated by spaces. All of the named keys must be pressed simultaneously to toggle the keyboard mapping. The key names are either the single character printable symbols on the key (e.g. A, 3 or ?) or one of the names from the following table:
|
backspace tab linefeed return escape space left right up down page_up page_down home end |
insert delete pause scroll_lock sys_req shift_l shift_r control_l control_r caps_lock shift_lock num_lock |
f1 f2 f3 f4 f5 f6 f7 f8 f9 f10 f11 f12 |
kp_left kp_right kp_up kp_down kp_page_up kp_page_down kp_home kp_hnd kp_add kp_subtract kp_multiply kp_divide kp_enter kp_middle |
pc_windows_l pc_windows_r pc_alt_l pc_alt_r pc_menu mac_cmd_l mac_cmd_r mac_alt menu |
The key names are not case sensitive. If more than one key name is specified then typically this will be one normal key and one or more modifier keys. However this is not required. The key combination may be purely modifier keys or may contain more than one normal key. Whatever combination, all the specified keys must be pressed to toggle the alternate keyboard layout. Note that the operating system may hide some key combinations from MEMU.
The second and subsequent lines define the alternate key mapping, one line per key. Each line consists of two key names, the first being the name of a key on the host keyboard (same format as the key names for line one). The second is the name of the corresponding MTX keyboard key. This can be a single printable character or one of the names from the following table:
|
shift_l shift_r ctrl alphalock space backspace ret tab |
left right up down linefeed home |
brk cls del esc eol ins page |
f1 f2 f3 f4 f5 f6 f7 f8 |
A typical configuraion file alt_keypad.kbd is:
F10
7       Page
8       EOL
9       Brk
u       Tab
i       Up
o       Del
j       Left
k       Home
l       Right
m       Ins
,       Down
.       Cls
This specifies F10 as the toggle key, and maps the 12 key trapisoidal block:
      789
      uio
      jkl
      m,.
to the keys of the MTX keypad in the same physical arrangement.
At present it is necessary to use a command line switch to specifiy the alternate keyboard mapping. The simplest method is to include a line such as the following in memu0.cfg:
-alt-kbd alt_keypad.kbd
TODO: Add an option to the configuration dialog to select an alternate keyboard mapping file.
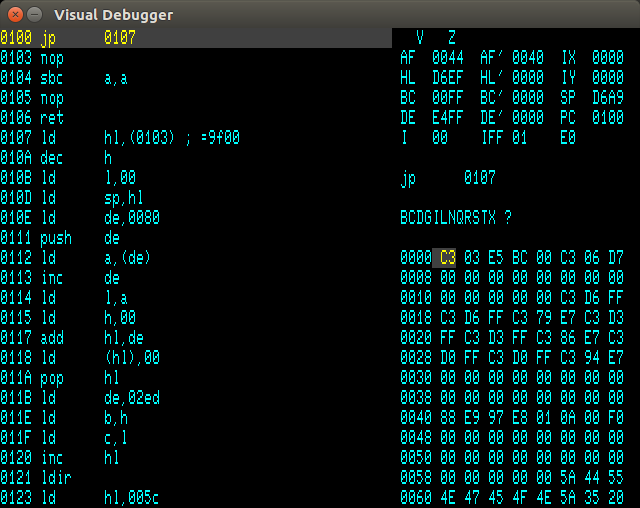
The MEMU Visual Debugger is a machine code inspector and debugger similar to the MTX PANEL command or the CP/M VDEB utility. However it offers a number of advantages over those tools:
To open the Visual Debugger, press and hold the <F9> key and press the "h" key.
Visual Debugger commands are invoked by pressing the key corresponding to the capital letter of the command.
Sets an address at which program execution will halt. Enter the required address as a hex number, and type <Return>. It is now possible to specify a specific ROM number or RAM page for the break. To do this type the two hex digit PAGE port selector (e.g. 40 for ROM 4, or 01 for RAM page 1), followed by a colon and then the address within that page. For example, to set a break at the start of the CRSPR routine enter 10:3E09. The page selector does not have to exactly match that specified for the break to occur, as long as they both point to the same location. Thus within the ROM region the RAM bits are ignored, while within RAM the ROM bits are ignored. If no page selector is specified, the current PAGE value is assumed.
When prompted for the Break Condition (COND>) there are a number of options:
Note that the Break command can only set one break condition at each address. However there may be breaks set for a number of different addresses.
Clears a break condition set at a specified address.
Displays a block of memory starting at the specified address. The values starting at this location may then be changed by typing two digit hex values followed by <Return>. Use <Esc> to stop editing values.
Starts program execution at specified address. If no address is specified (just <Return>) then start at the current value of the program counter (i.e continue execution). Optionally ("TO>" prompt) specify an address where execution is to halt again. The halt address may include a page specifier, as for the Break command.
Toggle between displaying memory in hex or ASCII.
List machine code starting at a specified address. If an address is specified, then the listing will remain fixed, starting at this address. If no address is given, then the listing will start at the location of the program counter, and will be updated whenever the program counter leaves the displayed listing.
Sets a temporary break point at the next instruction, and then starts execution.
Toggles on and off collection of an execution profile.
When turned on, all the counts are reset to zero, and a count of the number of instructions executed is shown to the right of the prompt line.
When turned off, the number of times each instruction was executed since profiling was turned on is saved to a file with the name "Profile_<date>_<time>.txt" in the current folder, with the format:
Address    	     Count
DBFD - DC00	      1920
FC65 - FC6D	      1542
FC6F - FC71	      1536
FE1D - FE1E	       450
DD20 - DD22	       290
DE53 - DE55	       241
DE58 - DE61	       228
DE64 - DE67	       227
Quits the Visual Debugger. The window will be closed and all breakpoints will be inactive until the Visual Debugger is re-opened.
Updates the value of the register pair pointed to by the register cursor. This cursor is moved by the stop "." key. Note that there is one step in the cycle when no register is selected.
Executes a single machine code instruction then updates the display.
For most machine code instructions, this is the same as "Step". For a subroutine call (one that is taken for a conditional call), execute until a return statement brings the stack pointer back to the current value. For most subroutines, this will execute the routine as a single step, even if the call is followed by parameter bytes. It will fail if the routine does not finish with a return statement (e.g. finishes with "JP (HL)").
Attempts to exit the current subroutine. Works by running until a return statement is executed with the stack pointer at the current value. This will usually work if you have just mistakenly stepped into a routine you are not interested in. It will fail if there have been mis-matched PUSH and POP statements since the subroutine call.
MEMU configuration is controlled by a large number of option flags or switches. These may be either in configuration files or specified on the command line.
For bare-metal systems the configuration will be specified in files "memu0.cfg" and "memu.cfg" in the root of the storage media.
For systems with an operating system, if MEMU is started without any command line options, then it will read the configuration from two files "memu0.cfg" and "memu.cfg".
MEMU now looks first for "memu.cfg" in the current folder. If found, it will read configuration from "memu0.cfg" (if it exists) and "memu.cfg" in the current folder. This allows for folder specific customisation if required. If there is no "memu.cfg" in the current folder, then "memu0.cfg" and "memu.cfg" from the same folder as the program executable is used.
The contents of the "memu0.cfg" file remain constant, while the "memu.cfg" file is re-written by the interactive configuration screen.
If there are any options specified on the command line, then the above configuration files will not be read automatically. Command line options may be used to read these (or other) configuration files.
When specifying file or folder path names, the following special macros may be used to specify the starting folder for a path;
By default, relative paths are taken from the folder containing the configuration.
The following options are supported on all versions of MEMU:
The following options are supported on the Linux and Microsoft Windows versions:
The following options only have any effect for resizeable windows (X-Window or Microsoft Windows):
The following options are currently for the Linux versions only:
The Raspberry Pi versions of MEMU (either the with OS or bare-metal versions) may be attached to real hardware: a Memotech keyboard, a Kempston style joystick, or a Centronics printer via the Raspberry Pi GPIO connections. The following option is used to enable this:
The Raspberry Pi build has one further option to control the use of the GPU:
MEMU includes many diagnostic features to assist developing and debugging Z80 code. Most of these are activated by the following additional options on the command line or in a configuration file:
A number of these diagnostics (and other features) may be turned on or off at run-time by pressing the <F9> key and a letter (the <F9> acting as a kind of shift key) as follows:
In addition to the above, MEMU supports three diagnostic windows:
MEMU has a special RAM snapshot feature. First, you tell MEMU how many of the RAM pages are to be included in the snapshot using the -mem-blocks-snapshot N command line argument. N is the number of 16KB RAM pages. This number is normally 0, but might reasonably be 4 when debugging. MEMU takes a snapshot just before the Z80 is started, and if you're running a RUN file from the MEMU command line, just before it is given control. In the Memu Memory Inspector window colours communicate the following:
Pressing o takes a new snapshot. Pressing v toggles whether you are looking at the current value, or the value in the snapshot.
If the optional feature of using GPIO to attach real hardware to MEMU is enabled, then it is necessary to provide a hardware configuration file to describe the attachments.
The hardware configuration file consists of blocks defining a particular interface, introduced by a name in square brackets, followed by the definition of that interface.
Most of the hardware definition file is defining which digital I/O pins connected to what hardware. These may be built in GPIO pins, or there is also support for one or more MCP23017 I2C port expanders.
These pin definitions take the form:
          GPIO, <gpiochip device>, <GPIO number>
          MCP23017, <I2C device>, <I2C address>, <MPC pin number>
Where:
This block of the configuration file is used to define the connection of a MTX matrix keyboard or equivalent. It takes the form:
          [keyboard]
          kb0 = <pin definition>
	        :
          kb9 = <pin definition>
          dr0 = <pin definition>
            :
          dr7 = <pin definition>
          reset = <pin definition>
          reset2 = <pin definition>
          dr_reset = <gnd | dr0-dr7>
The lines kb0 – kb9 define the 10 keyboard sense lines, and the lines dr0-dr7 define the 8 keyboard drive lines.
For an unmodified MTX keyboard, the reset line defines the I/O pin that one of the keyboard reset lines is connected to. The other reset line should be connected to ground (0v). In that case the reset2 and dr_reset lines would be omitted.
The MTX keyboard may be modified by soldering an additional connection to the track joining the two reset keys. In that case both the existing keyboard reset lines should be connected to IO pins, and defined by the reset and reset2 lines. The additional connection between the reset keys should either be connected to ground (0v) or to one of the keyboard drive lines. The dr_reset line specifies how this is connected (gnd is the default).
If a matrix keyboard is fitted, then Atari style joysticks may be connected to the drive and sense lines, in parallel with the keyboard, as per the MTX. In that case no joystick definition is required. Alternately, the separate joystick switches may be connected to I/O pins, and the common connection to ground, as per earlier versions of MEMU-Pi. In that case, the joystick connections are defined by a block of the form:
        [joystick_1]
        left = <pin definition>
        right = <pin definition>
        up = <pin definition>
        down = <pin definition>
        fire = <pin definition>
The second joystick, if fitted, is defined similarly in a [joystick_2] block.
A Centronics style printer port may be provided. It should be noted that the Centronics connector uses 5v logic, while the Raspberry Pi GPIO connections are only 3.3v and are not 5v tolerant. Therefore some form of level shifting is required, Probably the simplest solution is to use an MCP23017 powered from 5v, but the I2C pullup resistors taken to 3.3v. The printer hardware block takes the form:
        [printer]
        d0 = <pin definition>
	      :
        d7 = <pin definition>
        strobe = <pin definition>
        busy = <pin definition>
        error = <pin definition>
        pe = <pin definition>
        slct = <pin definition>
ote that the MTX PIO port is 5v logic while the Raspberry Pi GPIO connections are only 3.3v tolerant. Also it is not practical to implement the INSTB and OTSTB lines in software. HCT244, HCT245 or HCT373 are examples of devices that could provide an OTSTB function and 3.3v to 5v step-up (not HC chips). A HC373 or HCT373 are examples that could provide INSTB, but the outputs would need resistor dividers to connect to the Raspberry Pi GPIO. The PIO hardware definition block takes the form:
        [pio]
        pot0 = <pin definition>
	      :
        pot0 = <pin definition>
        pin0 = <pin definition>
	      :
        pin7 = <pin definition>